
A smoother January starts with a smarter plan
Taking down holiday lights sounds simple until Denver weather turns a quick weekend task into a cold, slippery, time-consuming project. A little planning helps you protect your roofline and landscaping, keep strands from tangling or cracking, and make next season’s install faster and safer. Below is a practical, Denver-specific takedown and storage plan used by homeowners and business owners who want their display to look great year after year—without the stress.
Why takedown planning matters (more than most people think)
Post-holiday removal is where many light sets get damaged. Common problems include yanking strands that are frozen in place, bending wires too tightly, or packing damp lights into a bin where corrosion starts quietly over the off-season. Safety is also a big factor: outdoor decorating is closely tied to ladder and fall risks, and electrical safety still applies during takedown (not just installation). Using outdoor-rated equipment and plugging into GFCI-protected outlets is widely recommended for seasonal lighting setups, and those habits should carry through removal as well.
Planning your takedown lets you:
• Reduce breakage and dead sections next year
• Avoid roof and gutter damage from rushed removal
• Keep extension cords, timers, and controllers organized
• Cut next season’s setup time dramatically
A simple “post-holiday inventory” that saves hours next year
Before you pull a single clip, take 5 minutes to document what you have. This is especially helpful for larger homes, rooflines with multiple peaks, commercial storefronts, and properties with trees and shrubs wrapped in sections.
| Area | What to note | Label idea |
|---|---|---|
| Front roofline | Strand count, bulb spacing, clip type, power source | “A1 – Front Roofline” |
| Garage peaks | Connector direction, timer/controller used | “A2 – Garage Peaks” |
| Entry columns/wraps | Wrap pattern, securing method, any worn spots | “B1 – Columns” |
| Trees / canopy | Trunk wrap vs. branch wrap, height zones, extension routing | “C – Maple Tree (Front)” |
| Commercial façade | Sections by storefront bay, access points, lift/ladder needs | “S1 – West Bay” |
Quick tip: snap a few photos before removal. Next year, those photos become your “map” for a consistent, clean look.
Step-by-step: an efficient takedown workflow (residential & commercial)
1) Pick the right day (and don’t fight ice)
Aim for a dry day above freezing when possible. If strands are frozen into clips or the roof edge is icy, forcing removal can snap wires, crack insulation, or pull on gutters. Give ice time to release naturally—especially around north-facing rooflines that stay shaded.
2) Power down safely before you touch anything
Turn off timers and unplug displays before handling. For outdoor seasonal lighting, using GFCI protection is a widely recommended safety practice; keep that mindset for takedown too. If you notice damaged cords, exposed copper, or melted sockets, stop and set that set aside for disposal or repair assessment.
3) Work “top-down” and “outer-to-inner”
Start with rooflines, then move to windows/railings, then shrubs and ground décor. On commercial sites, break it into zones (front elevation, side elevation, entry, signage) so you don’t end up with cords crossing and tangled mid-project.
4) Remove clips with control (no yanking)
Clips are designed to release; wires are not designed to be pulled. Support the strand with one hand while releasing clips with the other. If you’re on a ladder, maintain stable footing and avoid overreaching—small “just one more clip” moves are where slips happen.
5) Coil and label as you go (don’t make a pile)
A big pile on the lawn feels fast until you spend hours untangling next year. Coil each set immediately and add a label that matches your “post-holiday inventory” (A1, A2, B1, etc.). Many storage guides recommend reels/organizers or simple DIY options like wrapping strands around a hanger, cardboard, or a dedicated light reel to prevent tangles and reduce cable stress.
6) Do a quick condition check before storage
Look for frayed insulation, cracked sockets, bent prongs, or sections that flickered during the season. Set aside “replace” items now. This helps you avoid last-minute shopping or troubleshooting during installation next year.
Storage planning that keeps lights working longer
Denver’s temperature swings and dry air can be tough on plastics over time, and moisture can still sneak into garages and sheds. The goal is simple: keep everything dry, protected, untangled, and easy to find.
Best storage setup (simple, effective, repeatable)
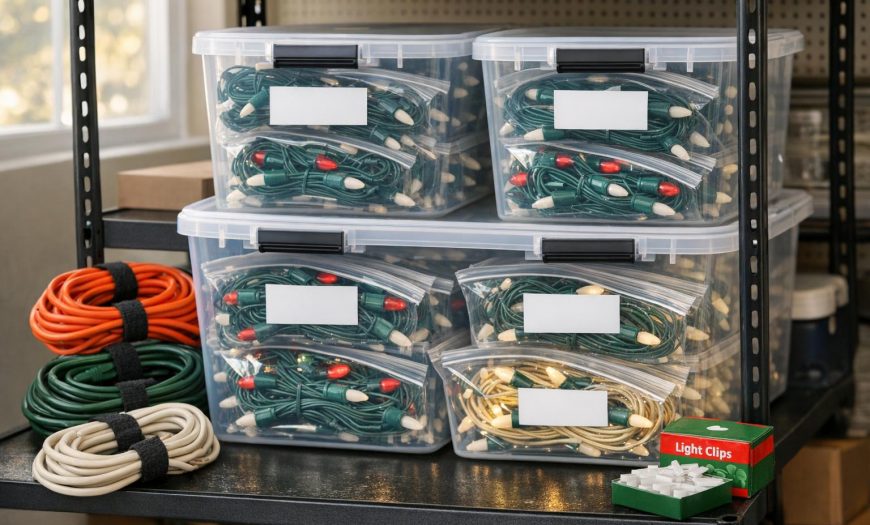
• Use latching plastic bins (helps reduce moisture and pests compared to open totes)
• Bag each labeled coil (zip bags keep sets separated and stop “bin tangles”)
• Add a bin inventory card (taped inside the lid: “A1, A2, B1…”)
• Keep lights out of high-heat areas (avoid spots that get hot/dry enough to speed up insulation wear)
• Store controllers/timers together in a smaller labeled container so they don’t disappear
| Item | What goes wrong | Storage fix |
|---|---|---|
| String lights | Tangles, insulation stress, broken bulbs | Coil on a reel/hanger; bag + label |
| Icicle lights | Snagging and knotting | Roll carefully; avoid tight folds |
| Extension cords | Mystery lengths, missing ends | Velcro ties + label length (25 ft / 50 ft) |
| Clips/fasteners | Lost clips = slower install next year | Small parts box labeled by roofline zone |
If you want a “one-trip setup” next year, store by installation order: roofline bin, then windows/rails, then trees/shrubs, then ground décor.
Did you know? Quick facts that help you avoid common damage
• Many safety agencies recommend using outdoor-rated light sets outside and plugging them into a GFCI-protected receptacle or a portable GFCI.
• Tight folding and sharp bends can stress wiring over time; careful coiling helps reduce insulation wear.
• Packing lights away damp can invite corrosion—drying before storage is one of the simplest ways to extend lifespan.
Local Denver angle: timing your takedown around snow and thaw cycles
Along the Front Range, it’s common to see quick shifts between sunny melt days and refreeze nights. That freeze/thaw cycle can lock clips in place and create slick roof edges. A practical Denver strategy is to plan takedown for a midday window after the sun has had time to warm south-facing rooflines, and to postpone north-facing or shaded sections until conditions are safe.
Also consider your property’s snow management: keep walkways clear before ladder work, and avoid creating new icy patches where people will walk. If you’re responsible for a storefront, prioritize pedestrian safety around entrances and loading areas during takedown days.
Want a hands-off takedown, organized storage, and a clean start next season?
Denver Christmas Light Installers provides full-service holiday lighting—design, installation, in-season maintenance, careful removal, and off-season storage—so your display stays safe, consistent, and ready to reinstall.
FAQ: Holiday light removal and storage
When should I take down my Christmas lights in Denver?
Pick a dry day when surfaces aren’t icy. If clips or wires are frozen in place, waiting for a safer thaw window helps prevent damage to both your lights and your gutters.
Is it okay to leave lights up through winter?
Some people do, but wind, ice, and repeated freeze/thaw cycles can add stress to wires and attachment points. If you plan to leave them up longer, inspect cords and clips periodically and avoid running damaged sets.
What’s the best way to store Christmas lights so they don’t tangle?
Coil each strand onto a reel, hanger, or cardboard form, then bag and label it. This prevents “bin knots” and keeps cables from being sharply bent.
Should I test lights before storing them?
A quick visual inspection during takedown is usually enough (cracks, frays, burned sockets). If you know a section was flickering, label it for repair/replacement so it doesn’t slow you down next season.
Do I need GFCI for outdoor holiday lights?
It’s a common safety recommendation to plug outdoor seasonal lights into a GFCI-protected receptacle (or use a portable GFCI). If you’re unsure about your outdoor outlets, an electrician can confirm what’s protected.
Can you handle removal and storage for commercial properties?
Yes—commercial takedown is often easiest when it’s planned by zones, labeled for reinstallation, and stored so next year’s setup is consistent across storefronts or multi-site locations. For service details, visit the Commercial Light Installation page.
Where can I see examples of professional displays?
Browse the Gallery for residential, commercial, and color-changing display ideas.
More questions? Visit FAQ’s or reach out through Let’s Talk.
Glossary (quick definitions)
GFCI
Ground-Fault Circuit Interrupter. A protective device designed to reduce the risk of electric shock by shutting off power when a ground fault is detected.
In-use (weatherproof) cover
A protective cover for outdoor outlets designed to keep moisture out even when cords are plugged in.
Freeze/thaw cycle
A weather pattern where daytime melting is followed by nighttime refreezing. This can create ice on roof edges, walkways, and attachment points.
Light reel
A storage organizer that allows you to wind strands neatly to reduce tangling and cable stress during the off-season.

Leave feedback about this